It’s the morning.
You open your laptop to check yesterday’s submissions.
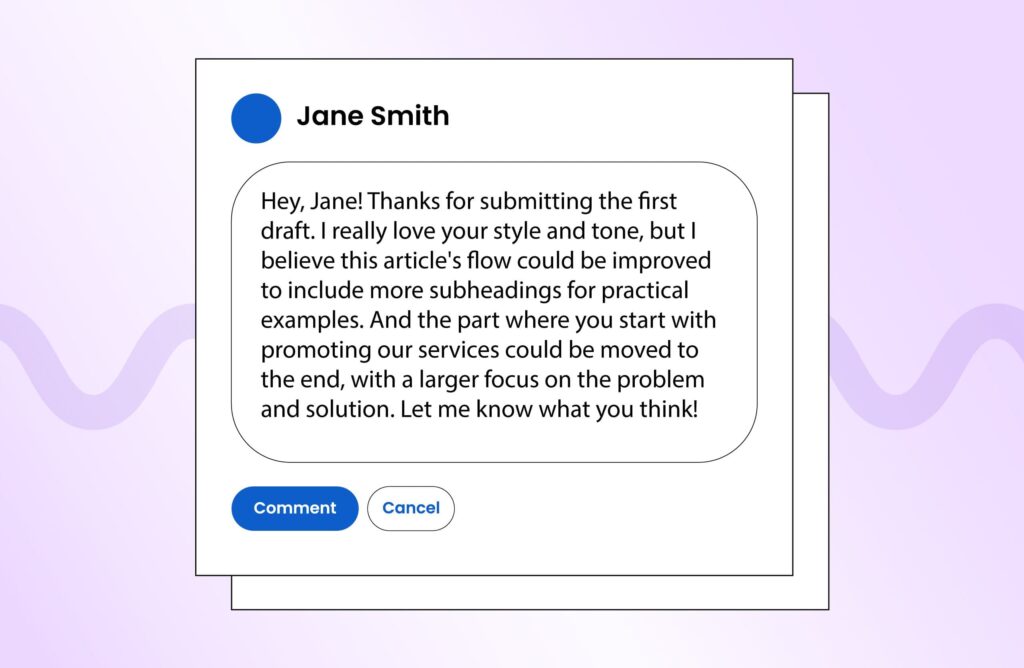
And there goes the client feedback that smells like a major rework and the looming deadlines!
As a writer, you know that playing with the flow of the already-written draft is like playing Jenga. It’s a risky game where you don’t want to disrupt or collapse the entire structure when you change some small pieces.
Here’s when you deeply regret not having an outline in the first place.
With the help of a blog post outline, you could have the client’s comments on the article’s structure before you spend your time and energy writing the entire draft. The outline makes it easier to get on the same page with the client and ensure they approve the draft quickly.
Not to mention, with the ready-to-go structure, the actual writing process becomes much smoother, faster and more enjoyable! Isn’t that a feeling we all crave for? 🙂
What Is a Blog Post Outline?
So, which type of outline should you use? A blog post outline is a plan that helps you break down the content into small pieces. It guides your writing process and allows you to organize your ideas in a logical way.
The outline usually includes headlines and subheadings, a few sentences explaining each section, the sources you’ll use, etc. It should also be part of a content brief, which includes the tone of voice, reader persona, and other relevant information to ensure the course of the post stays on track.
In a nutshell, a blog post outline is the skeleton of your content that can be fleshed out with exciting and creative ideas.

8 Techniques to Write a Blog Post Outline
Well, now that you know the importance of an outline and how it can help your writing process, let’s look at some effective techniques to craft one.
1. Define Your Purpose and Goals
It is crucial to be clear about your post goals and what you want to gain from it. Think about these in advance.
The Target Audience
Who’s this topic for? Who is most likely to read it? A crucial aspect here is to analyze WHY they would want to read it. If you know your audience’s pain points and how to address them, your post will make them feel “That’s exactly what I need!” from the start.
The Tone of Voice
You will often get away with the tone of voice dictated by the client’s brand guidelines. Aside from that, you need to tailor the tone of voice to your specific topic. If your topic is light-hearted, don’t be afraid to use humor. If it’s rather dry, keep a more serious tone and avoid too much sarcasm. Ensure your chosen tone of voice makes the text more inviting and accessible.
Content Format
Your topic’s intent will determine the format you should use. A “How-to” tutorial-based guide might be appropriate if your topic is meant to educate. If it’s more of an informative article, opt for a more laid-back approach with a “What” content format. You can use search engines’ omniscience to find the most effective writing format. What’s already ranking in Google, Bing, or other search engines for your topic is most likely the content format the target audience finds helpful. Follow it!
The Purpose of Content
You know what your audience is looking for. Now, you should mix that with what you want them to do by reading it. Your content should be written with a specific purpose – like creating awareness, providing information, persuading an audience to action, entertaining, or whatever it is you need your content to do.
Each purpose comes with its format and style. For example, conversion-oriented content requires a clear call to action and propelling language, while educational content needs to be in-depth, thoughtful, and considerate of the reader’s understanding level.
Pull together with your client to figure out their specific goals with the content piece. By clarifying that in advance, you can adjust your writing style to capture the emotional response you want to evoke and create a conversation that resonates.
2. Brainstorm and Organize Ideas
Remember doing scribbles on paper when you have too many ideas? It’s time to do that here.
Just let your imagination flow. Write down all the ideas that come to your mind about the topic. Don’t pull back from quirky or funny ideas. Any core idea found during your research should find its place in the list.

Once you have jotted down the ideas, arrange them into categories so that they make sense.
- Keep the most intriguing points for the introduction to hook your readers in.
- Create subheads for key points you’ve found during your research.
- Any insight that fought its way out of your brain? Save it for the conclusion, where you bring it all together.
When this initial breakdown is done, you have the skeleton of your piece. Now it’s time to add some flesh and substance.
Start by adding facts and data relevant to each point. Find reputable sources providing evidence for your claims or stories illuminating an otherwise dry idea.
Once you know approximately how much information can be transferred by each section, you can also allocate estimated word counts to different parts.
3. Conduct Content Gap Analysis
Imagine having a magic stick that reveals what your readers want besides what you have already included in your content. Content gap analysis is something just like that. It’s a process of discovering what questions readers might have that are addressed by your competitors but not you or are not addressed by anyone.
You can probably guess there’s no fast and easy way to do that, but we can hint you at some manual and automated solutions that can help.
Manual Content Gap Analysis
- Research competitors’ content to identify topics you could develop further. Look at your competitor’s page titles, images, and content to see what topics they have already covered.
- Closely monitor community discussions – in social media, forums, or other online channels – to see what questions readers ask and if they get answered. Identify any topics that seem to be missed by your competitors.
- Review your client’s journey to determine if there is enough content for each stage. Ask yourself if all questions that could arise from potential customers have been answered and if there is enough content to guide a customer through every decision-making step.
Automated Content Gap Analysis
- [ChatGPT + Vocable’s mix to identify some potential keywords for you]
- You can also use Content Gap Analysis of professional SEO tools like Ahrefs, SEMrush, or similar to find the keywords your competitors are ranking for. This will give you a better idea of what content is missing from your website and what topics you can focus on to increase visibility.

4. Make It SEO-Friendly
Okay! Now you know what content you should add and focus on, and it’s time to work on SEO.
Your SEO blog post outline should make it clear what keyword you are chasing. Each website page should have its own keyword (only one primary keyword per page), and you should work your way up to the top with proper SEO practices like using meta tags, alt tags, heading tags, etc.
So, have your primary keyword in the outline along with the related secondary keywords and phrases that will back it up. Drill down the details of your topic to ensure you get all the related keywords and phrases so your post is search engine friendly.
Done with the keywords? Half the battle is won.
Now, you should add other SEO-friendly elements to your SEO blog post outline, like internal and external links, targeted images, videos, and more. Before you get going with the actual writing, draw the sketch further and decide which links you’ll add to your post.
Put special attention on which internal sources you will link to and where it’s best to interlink. You should walk on eggshells when choosing internal links, as that can truly make or break your readers’ experience. With the right internal linking, you can guide your readers to where you want on your website or other platforms. Moreover, correctly placed internal links are crucial for the desired conversion rates.
Clearly mention in the outline where internal links will be placed and which messaging you’ll use to incorporate them. Get your clients’ opinions on that to ensure it matches their vision.
5. Define Headings and Subheadings
Well, it seems there is enough depth to your post structure to wrap up the sections with headings and subheadings finally. Think of them as the “mini-titles” that will guide your readers through the post.
For a moment, forget that the text between them is going to fill in the gaps and see if the subheadings flow into each other naturally. We know that’s not the best news for those who spend hours crafting detailed content, but skim-reading is a reality you have to face.
Many won’t read your post-word-by-word, but they will scan the subheadings and decide if the content is worth their time. So, turn on creativity for playful and eye-catching subheads that will capture the readers’ attention and pique their interest.
Here are some crucial tips to follow:
- Break long text into easily digestible chunks by using keyword-rich subheadings. Avoid long paragraphs that are not divided into sections.
- Use power words and idioms in your subheadings. Remember, they need to stand out and immediately grab readers’ attention.
- Opt for short, catchy phrases that communicate key ideas and encourage readers to dive deeper into the post.
- Move your key headings up front and center. Chances are higher readers will
When all your subheadings are organized in the outline, your client can see the big picture and ensure your post is aligned with their goals.
6. Use a Blog Post Outline Template
While your next blog article can significantly differ from the last one, certain elements make all blog posts effective. Creating a template with these components allows you to easily reuse it for future projects. Let’s see which common structures you can choose!
Inverted Pyramid
Let’s keep your readers intrigued and interested from the very beginning. This structure will allow you to drop the most important information right at the start and then add more details as you go along.
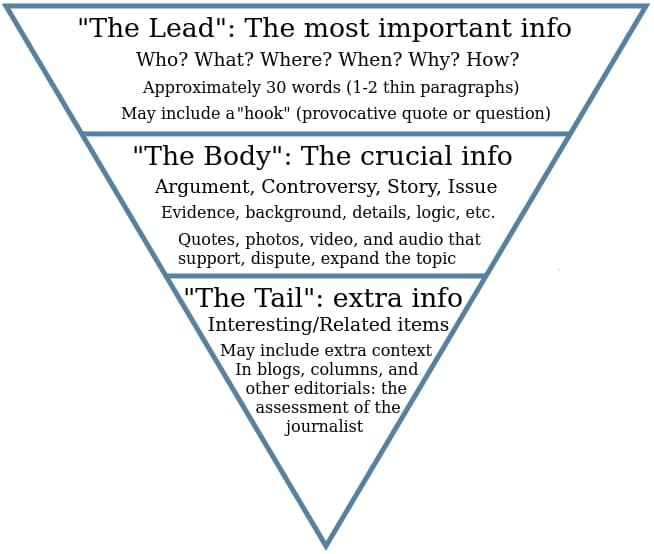
Source: Writing for Strategic Communication Industries, Jasmine Roberts
The inverted pyramid structure starts strong and gradually unfolds the narrative. For example, if you’re writing a blog post about a new product launch, you can start by mentioning the product’s most important features and then dive into its specifications.
Problem-Agitate-Solve
Do the marketers’ most beloved trick – stir your readers’ emotions by identifying a problem and then agitating it even further before offering a solution.
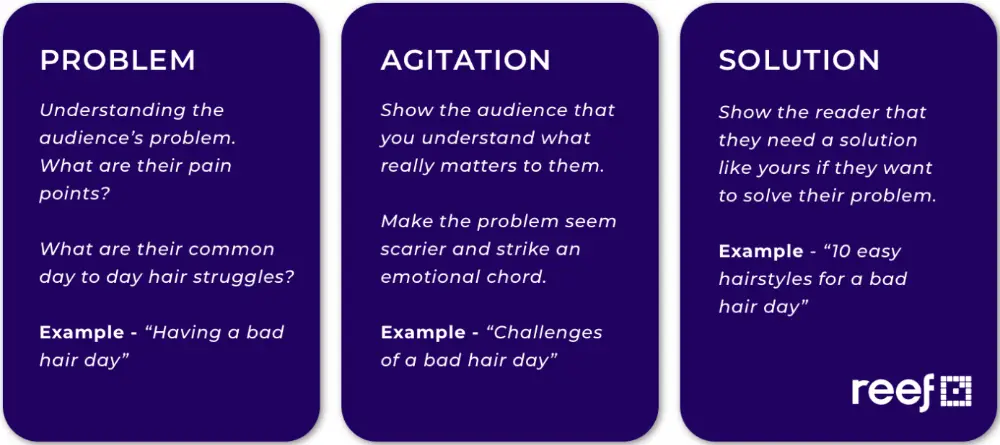
This structure implies that you should first state a problem related to your content, then make it more dramatic and finally wrap up the story by providing a solution. If everything’s done correctly, the problem-agitate-solve structure should be like a roadmap to your readers that will lead them from your content piece to the promoted product.
Ask ChatGPT
As this AI-powered chat emerged, marketers worldwide started exploiting it and using it as an efficient content marketing tool. As simple as that, you can ask ChatGPT to prepare a blog post outline for you like you chat with a friend.
In a second, you will have a ready free blog post outline. Added manual fact-checking and some extra research, and you’d have a blog post outline ready to go.
If you can develop the right commands for ChatGPT, which includes all your key points and user intent, the chat will give you outlines with pretty much the same structure every time, making consistent content creation a breeze.
7. Keep It Flexible
Here’s some advice – always leave some room for adjustment in your blog post outline, especially if you approve it with the client before taking the content route. This way, you can better handle any changes that might come up and be prepared for whatever direction the writing goes in.
That’s because, after all, you do different depths of research when preparing the outline and the final post. There are some key points you may have missed out on or a new angle to take that you hadn’t considered.
So don’t get caught up in the details – keep your outline flexible.
8. Revise and Refine Your Outline
When you close your laptop for a while and then return to it with fresh eyes, you start noticing things that need improvement.
It’s like having a second opinion – you can spot the typos and weak grammar you overlooked before and put the finishing touches on your outline, ensuring it looks polished and professional.
In other words, don’t settle for what your initial draft looks like. Leave some time to go back and take a second look at your blog post outline.

It’s especially important to look for gaps in logic and areas that need more detail or explanation. Identifying the sections where you need an expert opinion from an outside source is also crucial. For example, if you need professional assistance from your client or a third-party vendor, highlight that in your outline and plan for it accordingly.
Just leave a note in your draft reminding you to involve an expert when writing certain parts. Ask your client to add their two cents by providing you with additional information that can help fill any holes in your post.
That’s it! You have a tidy outline highlighting your post’s different parts.
Writing long content doesn’t seem as daunting as it once did, right? Now you have the structure, and you can fill it in like painting by numbers instead of just throwing paint at a canvas and then seeing what sticks.
Reasons to Choose Outlines over Free-Writing
Why outline when you can free-write? Well, here are the top reasons writers favor outlines over free writing, especially when it comes to larger pieces of content.
1. Overcome Writer’s Block
Oh, that dreaded writer’s block! You sit there staring at the screen, nothing comes to mind, and you feel like giving up. With an outline, your ideas are already mapped out, so you can pick up where you left off and get your creativity flowing again.
With the blog post outline ready, all you have to do is fill in the gaps. Your brain works under less pressure as you no longer try to develop ideas from scratch.
2. Collaboration Between Writer, Editor, and Client
We’ll never get tired of repeating this one: a blog post outline is the key to successful collaboration.

When different people are involved in the writing and editing process, things can easily get messy if there’s no outline to work from. If you write on your own and get feedback only when the post is finished, you may have to start from the square once again.
What if changes need to be made?
What if the editor or client has an entirely different point of view?
With an outline, all parties are on the same page from the get-go, preventing a lot of back and forth.
3. Stay on Track
It can sound funny, but outlines also can help you control yourself when writing, ensuring you don’t get distracted or off-topic. It gives you an idea of what needs to be written and when, so you can avoid getting lost in the weeds.
4. Enhance Readability
Lastly, with the blog post outline, you structure your thoughts more organized, making it easier for your audience to follow along and understand your message. You secure yourself from writing run-on sentences, long paragraphs and a lack of transitions.
Plus, the outline helps you ensure that your post is well-balanced and covers all the points you want to make.
The Bottom Line
To round it all up, working with blog post outlines is a professional approach to collaboration with your team and clients that help all project participants approve the initial structure of the blog before the final draft is ready. They are a lifesaver in keeping your ideas organized, staying on track, and avoiding detours.
With modern technology making outlining even more efficient with the help of AI, there is one more reason to get on board the outlining wagon! Automated outlining algorithms can help create and organize outlines quickly, saving time and effort during the writing process.